
Today we’re going to be making the spectrogram visualization I demonstrated in my Automated Video Editor video. This post has an accompanying video, if you’d like to follow along with it as well.
A spectrogram is a way to view how an audio spectrum changes over time. Spectrum meaning the range of frequencies or tones that make up a particular sound (anywhere from deep bass to a high pitched whistle, and beyond). The reason that people sound differently when they talk is that the shape of their audio spectrums are different. Essentially, the way their vocal cords, mouth and sinuses modulate the air waves as they reach your ears has a slightly different pattern. This gives each voice a distinct and recognizable feel. As an example, below are images of the averaged spectral response of males and females speaking three different languages (Image from Erik Bernhardsson’s really fascinating blog post). You can see that while overall, most human voice information lies between 50-500hz, there is actually a lot of variation not only between male and female speakers but even between people using different languages! (There could also be a genetic/cultural aspect to this as well, since culture and language are largely intertwined.)

Our goal today is to create our own spectrum analyzer which can run in real time in your web browser that you can use to do your own spectrum analysis of everyday sounds from objects. Ours will be a bit different than the images above, though. These are single “snapshots” of the tones within one sound. We are going to create a flowing visualization of how this spectrum changes over time, which I think is a lot more interesting to watch.
To do our visualization, we’re going to be using the Three.js library. It is a fantastic resource for handling the modeling and rendering of 3D geometries. We’re only going to be using a tiny fraction of its potential, since we’re just going to be building a pretty simple mesh (essentially a heightmap) but it’s definitely worth looking into further if you enjoy this project.
To get started, we need to build up a scene. This means creating a camera and some triangulated geometry to image into the camera. We actually don’t need a light source, we’re going to give color to our surface directly. First we write our boilerplate html code here; the main thing to note is that we have added a div inside of the main. We’ll use this to attach our spectrogram visualization to later. We also are sourcing the three.js library in the same folder as our html file, for convenience. You can download that file here and just copy it to the folder your html file is in. Here’s how to create an html file, if you never have before.
Spectrogram
// <- Shaders go here.
Next, we’ll set up a scene. A lot of this is more or less copy paste from the three.js examples page where we’re just defining the camera and other things. Our geometry is actually quite simple, its just a single mesh with a width equal to the number of time samples we would like to display on the page at once (essentially how many spectral “snapshots” we should see). The height depends on the resolution of our data analyzer (essentially how many frequencies we are checking from our microphone). Everything we are adding here will go inside the “Script” portion of the above code. Its a lot of code, so I have added comments to make each line more clear.
"use strict";
// Initialize Scene parameters
let frequency_samples = 512; // Y resolution
let DATA = new Uint8Array(frequency_samples); // for later
let camera, scene, renderer;
let heights, mesh;
let time_samples = 1200; // X resolution
let n_vertices = (frequency_samples+1) * (time_samples+1);
let xsegments = time_samples;
let ysegments = frequency_samples;
let xsize = 35;
let ysize = 20;
let xhalfSize = xsize/2;
let yhalfSize = ysize / 2;
let xsegmentSize = xsize / xsegments; //Size of one square
let ysegmentSize = ysize / ysegments;

init();

function init() {
	// Place the camera in space
	camera = new THREE.PerspectiveCamera( 27, window.innerWidth / window.innerHeight, 1, 1000 );
	camera.position.z = 64;
	scene = new THREE.Scene();
	let geometry = new THREE.BufferGeometry();
	let indices = [];
	heights = [];
	let vertices = [];

	// generate vertices for a simple grid geometry
	for (let i = 0; i <= xsegments; i ++ ) {
		let x = ( i * xsegmentSize ) - xhalfSize; //midpoint of mesh is 0,0
		for ( let j = 0; j <= ysegments; j ++ ) {
			let y = (j * ysegmentSize) - yhalfSize;
			vertices.push( x, y, 0);
			heights.push(0); // for now our mesh is flat, so heights are zero
		}
	}
	// Add the position data to the geometry buffer
	geometry.setAttribute( 'position', new THREE.Float32BufferAttribute( vertices, 3 ) );

	// generate indices (data for element buffer). This says where each triangle goes
	// the code might look complex, but it is essentially the way you tile the plane with
	// triangles. Each square segment has 4 vertices, a, b, c, d. Which make 2 triangles.
	// a  b
	// d  c
	// Looking above, we can make a triangle by connecting a b d
	// a-b
	// d
	// and similarly for b c d. These make the two faces of our mesh segment.

	for (let i = 0; i < xsegments; i ++ ) {
		for ( let j = 0; j < ysegments; j ++ ) {
			let a = i * ( ysegments + 1 ) + ( j + 1 );
			let b = i * ( ysegments + 1 ) + j;
			let c = ( i + 1 ) * ( ysegments + 1 ) + j;
			let d = ( i + 1 ) * ( ysegments + 1 ) + ( j + 1 );
			// generate two faces (triangles) per iteration
			indices.push( a, b, d ); // face one
			indices.push( b, c, d ); // face two
		}
	}
	geometry.setIndex( indices );

	// Initialize the renderer and connect it to the DIV
	renderer = new THREE.WebGLRenderer( { antialias: true } );
	renderer.setPixelRatio( window.devicePixelRatio );
	renderer.setSize( window.innerWidth, window.innerHeight );
	let container = document.getElementById( 'Spectrogram' );
	container.appendChild( renderer.domElement );

	// Give the mesh a material with color (Purple)
	let material = new THREE.MeshBasicMaterial({color:"#433F81"});
	mesh = new THREE.Mesh( geometry, material );
	scene.add( mesh );

	// Render the scene!
	renderer.render(scene, camera);
Ok, I know there’s a lot of code up there. But it essentially comes down to three major parts: Initialize variables, build the mesh geometry (setting positions for each triangle in the mesh, as well as the connection graph between triangles), and render the scene. When we run that code, we get the following image.
See the Pen LYRvBjJ by caleb (@calebgannon) on CodePen.
So we know our mesh is working! Now we get to the fun stuff – adding height to our mesh. Since we want our code to run quickly, We’re going to do this using GPU Shaders. If you’ve never heard of those before, they can sound daunting, but they’re honestly not so bad. Essentially, Shaders are a set of instructions for your graphics card telling it how to draw stuff on the screen. There are two main kinds of shaders: vertex shaders and fragment shaders. Vertex shaders tell the GPU how to handle vertices of a mesh geometry and fragment shaders tell the GPU how to draw each individual pixel. There are plenty of introductory explanations out there for GPU Shaders, like this, this, and this. I personally recommend The Book of Shaders for its completeness and clarity.
For now, I’ll just show you a shader and hopefully it will be a bit more clear. Here is the default vertex shader. To use it in HTML/Javascript we put it inside of a
Essentially, the whole computation comes down to that one line of code within main. All it is doing is calculating the position of the mesh as seen from the camera. The variable ‘position’ is what we passed into our buffer above with the ‘geometry.setattribute(position)’ line of code, it is just a list of the x,y,z coordinates of the mesh. Then a few matrix transformations are applied to those coordinates depending on the camera focus settings, giving us the resulting position on the screen.
The important thing here, is to notice that we can pass values into our shader (like we did with the position coordinates) and use those values to determine how the geometry is drawn to the screen. The position vector is a special parameter, so it is pre-defined. If we want to pass in our own, custom information it can be done through something called a “uniform” (or attribute which is like a uniform but specific to the vertex shader) . We’re interested in this because we’re going to use it to send height information to our shader, so it will draw our flat mesh as if it was a bumpy terrain. Take a look at the slightly modified version of our shader below.
Here we are passing in a float value for displacement, and using it to calculate a new vector “newPosition”. This new position is calculated by adding distance to our position along the direction of our normal vector. In the case of a flat plane, this direction is up! Then we tell the graphics card to draw our mesh as if it was at this modified position. This should give us something that looks like a bumpy terrain (even though our mesh itself is actually flat!)
Next we’ll talk about fragment shaders— these take the geometry from the vertex shader and draw it to the screen. For this code, we really don’t have to get too complex with our fragment shader. We’re just going to use it to give color to our mesh (similar to how we defined it to be purple above). For that, all we need to do is pass in a “varying” object. Unlike uniforms, “varying” can be different for each vertex along the mesh. The fragment shader takes in all this information and interpolates between the vertices to provide a smooth transition. For example, if we pass in color values for each vertex in our mesh this shader will calculate a nice transition between them.
To supply this varying to the fragment shader, we need to pass in a value from the vertex shader. The basic flow of information is the cpu hands uniforms to our vertex shader on the GPU. The vertex shader then passes information to the fragment shader. So we’ll modify our vertex shader slightly to take in a color and hand it off to the fragment shader.
Now we need to add this small bit of code into our Javascript so that it can find the shaders and uniforms and use them to render the scene.
// This bit of code defines a lookup table (LUT) for our colors.
// Right now we are only providing one color in this "string" value below (Red).
// This will be useful later on when we want a variety of colors to work with
// We will just add colors to this string and send them to the shader
let string = [[0.5,0,0]]; // [R, G, B]
var lut = [];
for (let n=0;n<1;n++) { //Fill out LUT with the color information
    lut.push(new THREE.Vector3((string[n][0]*255-49)/206., (string[n][1]*255-19)/236., (string[n][2]*255-50)/190.));
}
//Grab the shaders from the document
var vShader = document.getElementById('vertexshader');
var fShader = document.getElementById('fragmentshader');
// Define the uniforms. V3V gives us a 3vector for RGB color in out LUT
var uniforms = {
    vLut: {type: "v3v", value: lut}
}
// Bind the shaders and uniforms to the material
let material = new THREE.ShaderMaterial( {
    uniforms: uniforms,
    vertexShader:   vShader.text,
    fragmentShader: fShader.text
} );
That’s all there is to it! Let’s quickly modify our original code to incorporate this new shader, as well as throw in some random height values so we can make sure it is working.
// generate vertices for a simple grid geometry
	for (let i = 0; i <= xsegments; i ++ ) {
		let x = ( i * xsegmentSize ) - xhalfSize; //midpoint of mesh is 0,0
		for ( let j = 0; j <= ysegments; j ++ ) {
			let y = (j * ysegmentSize) - yhalfSize;
			vertices.push( x, y, 0);
			heights.push(Math.random()*255); // no longer flat
		}
	}
// convert heights to a Uint8array
heights = new Uint8Array(heights);
// This bit of code is what passes information from the "Heights" array
// on the cpu into the vertex shader attribute "displacement"
geometry.setAttribute('displacement', new THREE.Uint8BufferAttribute(heights,1));We also need to tell three.js to calculate the normal vectors of our mesh, so that our normal value in the vertex shader is defined.
mesh.geometry.computeFaceNormals();
mesh.geometry.computeVertexNormals();
Running all of that code, you should see something like the following image. A reddish mesh with some spikes sticking out of it. The spikes come from the displacements we passed into our vertex shader, and the color comes from the LUT we passed into the fragment shader! Feel free to play around with the values (lowering the scale of the heights or changing the color) to see what happens!
See the Pen QWKPBOK by caleb (@calebgannon) on CodePen.
That image looks… ok, but since everything is the same color it’s really hard to gain any information from the center of the screen. So lets change our color scheme to give each point a different color based on its height! Here’s where the LUT we defined previously comes in handy. Right now, there is just one value (red). But in theory we can pass in as many colors as we want! We can assign a color to each height value, sort of like a color ramp. If you’ve ever used Matlab or Python for plotting, you might be familiar with color ramps that look like the image below (taken from npm.js).

With these, you can see there is a progression of discrete colors from left to right. Look at jet for example: In this image we can see something like 100 different colors. If we pass in a list of these 100 colors into our vertex shader we can assign them according to the displacement height. For example, a displacement of 0 we color with dark blue, a displacement of 50 is green and a displacement of 100 is red. There are many ways to import these lookup tables, but for the sake of simplicity I simply copy pasted the “Jet” colormap into the javascript code as an array with 256 elements, each element being a set of 3 RGB colors. It’s kind of messy to look at, but if you scroll along to the side you can see the colors progress from blue to more heavy reds.
let string = [[0.18995,0.07176,0.23217],[0.19483,0.08339,0.26149],[0.19956,0.09498,0.29024],[0.20415,0.10652,0.31844],[0.20860,0.11802,0.34607],[0.21291,0.12947,0.37314],[0.21708,0.14087,0.39964],[0.22111,0.15223,0.42558],[0.22500,0.16354,0.45096],[0.22875,0.17481,0.47578],[0.23236,0.18603,0.50004],[0.23582,0.19720,0.52373],[0.23915,0.20833,0.54686],[0.24234,0.21941,0.56942],[0.24539,0.23044,0.59142],[0.24830,0.24143,0.61286],[0.25107,0.25237,0.63374],[0.25369,0.26327,0.65406],[0.25618,0.27412,0.67381],[0.25853,0.28492,0.69300],[0.26074,0.29568,0.71162],[0.26280,0.30639,0.72968],[0.26473,0.31706,0.74718],[0.26652,0.32768,0.76412],[0.26816,0.33825,0.78050],[0.26967,0.34878,0.79631],[0.27103,0.35926,0.81156],[0.27226,0.36970,0.82624],[0.27334,0.38008,0.84037],[0.27429,0.39043,0.85393],[0.27509,0.40072,0.86692],[0.27576,0.41097,0.87936],[0.27628,0.42118,0.89123],[0.27667,0.43134,0.90254],[0.27691,0.44145,0.91328],[0.27701,0.45152,0.92347],[0.27698,0.46153,0.93309],[0.27680,0.47151,0.94214],[0.27648,0.48144,0.95064],[0.27603,0.49132,0.95857],[0.27543,0.50115,0.96594],[0.27469,0.51094,0.97275],[0.27381,0.52069,0.97899],[0.27273,0.53040,0.98461],[0.27106,0.54015,0.98930],[0.26878,0.54995,0.99303],[0.26592,0.55979,0.99583],[0.26252,0.56967,0.99773],[0.25862,0.57958,0.99876],[0.25425,0.58950,0.99896],[0.24946,0.59943,0.99835],[0.24427,0.60937,0.99697],[0.23874,0.61931,0.99485],[0.23288,0.62923,0.99202],[0.22676,0.63913,0.98851],[0.22039,0.64901,0.98436],[0.21382,0.65886,0.97959],[0.20708,0.66866,0.97423],[0.20021,0.67842,0.96833],[0.19326,0.68812,0.96190],[0.18625,0.69775,0.95498],[0.17923,0.70732,0.94761],[0.17223,0.71680,0.93981],[0.16529,0.72620,0.93161],[0.15844,0.73551,0.92305],[0.15173,0.74472,0.91416],[0.14519,0.75381,0.90496],[0.13886,0.76279,0.89550],[0.13278,0.77165,0.88580],[0.12698,0.78037,0.87590],[0.12151,0.78896,0.86581],[0.11639,0.79740,0.85559],[0.11167,0.80569,0.84525],[0.10738,0.81381,0.83484],[0.10357,0.82177,0.82437],[0.10026,0.82955,0.81389],[0.09750,0.83714,0.80342],[0.09532,0.84455,0.79299],[0.09377,0.85175,0.78264],[0.09287,0.85875,0.77240],[0.09267,0.86554,0.76230],[0.09320,0.87211,0.75237],[0.09451,0.87844,0.74265],[0.09662,0.88454,0.73316],[0.09958,0.89040,0.72393],[0.10342,0.89600,0.71500],[0.10815,0.90142,0.70599],[0.11374,0.90673,0.69651],[0.12014,0.91193,0.68660],[0.12733,0.91701,0.67627],[0.13526,0.92197,0.66556],[0.14391,0.92680,0.65448],[0.15323,0.93151,0.64308],[0.16319,0.93609,0.63137],[0.17377,0.94053,0.61938],[0.18491,0.94484,0.60713],[0.19659,0.94901,0.59466],[0.20877,0.95304,0.58199],[0.22142,0.95692,0.56914],[0.23449,0.96065,0.55614],[0.24797,0.96423,0.54303],[0.26180,0.96765,0.52981],[0.27597,0.97092,0.51653],[0.29042,0.97403,0.50321],[0.30513,0.97697,0.48987],[0.32006,0.97974,0.47654],[0.33517,0.98234,0.46325],[0.35043,0.98477,0.45002],[0.36581,0.98702,0.43688],[0.38127,0.98909,0.42386],[0.39678,0.99098,0.41098],[0.41229,0.99268,0.39826],[0.42778,0.99419,0.38575],[0.44321,0.99551,0.37345],[0.45854,0.99663,0.36140],[0.47375,0.99755,0.34963],[0.48879,0.99828,0.33816],[0.50362,0.99879,0.32701],[0.51822,0.99910,0.31622],[0.53255,0.99919,0.30581],[0.54658,0.99907,0.29581],[0.56026,0.99873,0.28623],[0.57357,0.99817,0.27712],[0.58646,0.99739,0.26849],[0.59891,0.99638,0.26038],[0.61088,0.99514,0.25280],[0.62233,0.99366,0.24579],[0.63323,0.99195,0.23937],[0.64362,0.98999,0.23356],[0.65394,0.98775,0.22835],[0.66428,0.98524,0.22370],[0.67462,0.98246,0.21960],[0.68494,0.97941,0.21602],[0.69525,0.97610,0.21294],[0.70553,0.97255,0.21032],[0.71577,0.96875,0.20815],[0.72596,0.96470,0.20640],[0.73610,0.96043,0.20504],[0.74617,0.95593,0.20406],[0.75617,0.95121,0.20343],[0.76608,0.94627,0.20311],[0.77591,0.94113,0.20310],[0.78563,0.93579,0.20336],[0.79524,0.93025,0.20386],[0.80473,0.92452,0.20459],[0.81410,0.91861,0.20552],[0.82333,0.91253,0.20663],[0.83241,0.90627,0.20788],[0.84133,0.89986,0.20926],[0.85010,0.89328,0.21074],[0.85868,0.88655,0.21230],[0.86709,0.87968,0.21391],[0.87530,0.87267,0.21555],[0.88331,0.86553,0.21719],[0.89112,0.85826,0.21880],[0.89870,0.85087,0.22038],[0.90605,0.84337,0.22188],[0.91317,0.83576,0.22328],[0.92004,0.82806,0.22456],[0.92666,0.82025,0.22570],[0.93301,0.81236,0.22667],[0.93909,0.80439,0.22744],[0.94489,0.79634,0.22800],[0.95039,0.78823,0.22831],[0.95560,0.78005,0.22836],[0.96049,0.77181,0.22811],[0.96507,0.76352,0.22754],[0.96931,0.75519,0.22663],[0.97323,0.74682,0.22536],[0.97679,0.73842,0.22369],[0.98000,0.73000,0.22161],[0.98289,0.72140,0.21918],[0.98549,0.71250,0.21650],[0.98781,0.70330,0.21358],[0.98986,0.69382,0.21043],[0.99163,0.68408,0.20706],[0.99314,0.67408,0.20348],[0.99438,0.66386,0.19971],[0.99535,0.65341,0.19577],[0.99607,0.64277,0.19165],[0.99654,0.63193,0.18738],[0.99675,0.62093,0.18297],[0.99672,0.60977,0.17842],[0.99644,0.59846,0.17376],[0.99593,0.58703,0.16899],[0.99517,0.57549,0.16412],[0.99419,0.56386,0.15918],[0.99297,0.55214,0.15417],[0.99153,0.54036,0.14910],[0.98987,0.52854,0.14398],[0.98799,0.51667,0.13883],[0.98590,0.50479,0.13367],[0.98360,0.49291,0.12849],[0.98108,0.48104,0.12332],[0.97837,0.46920,0.11817],[0.97545,0.45740,0.11305],[0.97234,0.44565,0.10797],[0.96904,0.43399,0.10294],[0.96555,0.42241,0.09798],[0.96187,0.41093,0.09310],[0.95801,0.39958,0.08831],[0.95398,0.38836,0.08362],[0.94977,0.37729,0.07905],[0.94538,0.36638,0.07461],[0.94084,0.35566,0.07031],[0.93612,0.34513,0.06616],[0.93125,0.33482,0.06218],[0.92623,0.32473,0.05837],[0.92105,0.31489,0.05475],[0.91572,0.30530,0.05134],[0.91024,0.29599,0.04814],[0.90463,0.28696,0.04516],[0.89888,0.27824,0.04243],[0.89298,0.26981,0.03993],[0.88691,0.26152,0.03753],[0.88066,0.25334,0.03521],[0.87422,0.24526,0.03297],[0.86760,0.23730,0.03082],[0.86079,0.22945,0.02875],[0.85380,0.22170,0.02677],[0.84662,0.21407,0.02487],[0.83926,0.20654,0.02305],[0.83172,0.19912,0.02131],[0.82399,0.19182,0.01966],[0.81608,0.18462,0.01809],[0.80799,0.17753,0.01660],[0.79971,0.17055,0.01520],[0.79125,0.16368,0.01387],[0.78260,0.15693,0.01264],[0.77377,0.15028,0.01148],[0.76476,0.14374,0.01041],[0.75556,0.13731,0.00942],[0.74617,0.13098,0.00851],[0.73661,0.12477,0.00769],[0.72686,0.11867,0.00695],[0.71692,0.11268,0.00629],[0.70680,0.10680,0.00571],[0.69650,0.10102,0.00522],[0.68602,0.09536,0.00481],[0.67535,0.08980,0.00449],[0.66449,0.08436,0.00424],[0.65345,0.07902,0.00408],[0.64223,0.07380,0.00401],[0.63082,0.06868,0.00401],[0.61923,0.06367,0.00410],[0.60746,0.05878,0.00427],[0.59550,0.05399,0.00453],[0.58336,0.04931,0.00486],[0.57103,0.04474,0.00529],[0.55852,0.04028,0.00579],[0.54583,0.03593,0.00638],[0.53295,0.03169,0.00705],[0.51989,0.02756,0.00780],[0.50664,0.02354,0.00863],[0.49321,0.01963,0.00955],[0.47960,0.01583,0.01055]];
var lut = [];
for (let n=0;n<256;n++) {
//This line modifies the colors slightly
// it sets the starting value to black, rather than deep blue
lut.push(new THREE.Vector3((string[n][0]*255-49)/206., (string[n][1]*255-19)/236., (string[n][2]*255-50)/190.));
}
Now that we are passing in a LUT with 256 values, we again need to update our fragment shader to handle this change. The number 256 here defines the size of the uniform we are passing in. To find an index, since our displacement ranges from 0-255, I simply convert the float displacement to an int, then grab the corresponding color from the LUT at that index and pass it to the fragment shader though the varying “vColor”.
Now if we run that code, we get a much cooler looking image!
See the Pen vYXMazq by caleb (@calebgannon) on CodePen.
So we have the geometry down, next we need to add motion. For the spectrogram, essentially the way it works is that each frame we shift everything one section to the left, then capture the audio spectrum and plot it vertically on the rightmost section of the mesh. Repeating this frame after frame gives us this scrolling effect from right to left. We’ll set up the sound input later, for now lets get our mesh to start out flat and update from right to left.
We’re going to use three main functions to control the animation of our scene: Animate which is the one we call to start the animation process, Render which we call each frame to render the scene and Update Geometry, which we use to update the mesh values before re-rendering the scene in each frame. Splitting up the jobs like this makes each individual part much easier.
function animate() {
// requestAnimationFrame calls this function at a set frame rate
// its a really easy way to set up a loop over time
	requestAnimationFrame( animate );
	render();
}

function render() {
	update_geometry();
	renderer.render( scene, camera );
}

function update_geometry() {
	//We need to figure out what to put in here!
}
The first two functions are relatively straightforward, once you’ve seen them. It might be worth doing some reading about the specifics of requestAnimationFrame, there’s a lot of cool stuff going on there. But for our purposes we can just assume that it will handle the job of “Do this thing at as many frames per second as our browser can draw”. In our case, we have put a call to the render function inside of the recursively called animate loop. This lets us render the scene every frame.
For the update geometry loop, our job is to do two things. First we need to shift everything one to the left. The problem is that our heights array is not an nxm array, its just a long list. This isn’t too big of a problem though, since we know the height of our mesh is equal to the number of frequency samples + 1 (we’ll call this n). So we can just shift all of values in our heights array towards the beginning of the array by n terms (saving over the first n terms, the line that “falls off” the left side). This frees up exactly n new terms for us to add to our array, which should fill the right side! In code, that looks like this.
function update_geometry() {
	let start_val = frequency_samples+1;
	let end_val = n_vertices -start_val;
	heights.copyWithin(0, start_val, n_vertices+1);
}
The copyWithin function here might seem fancy, but essentially it is just a really optimized way to shift around pointers in memory so we can update our array without taking up time that we will need for rendering our scene later. I linked to the documentation for those who are curious how it works.
Next we need to fill our newly freed up space in the heights array with new memory. We already initialized an array called “DATA” at the beginning of our code, so we just have to fill it with random numbers each loop. I’m doing this with the crypto.getRandomValues function. Then we set the data within our heights array equal to DATA using the UInt8.set command before updating our displacement attribute with the new value for heights.
function update_geometry() {
	crypto.getRandomValues(DATA);
	let start_val = frequency_samples+1;
	let end_val = n_vertices -start_val;
	heights.copyWithin(0, start_val, n_vertices+1);
	heights.set(DATA, end_val-start_val);
	mesh.geometry.setAttribute('displacement', new THREE.Uint8BufferAttribute(heights, 1));
}
We also need to change our heights initialization back to zeros.
// generate vertices for a simple grid geometry
	for (let i = 0; i <= xsegments; i ++ ) {
		let x = ( i * xsegmentSize ) - xhalfSize; //midpoint of mesh is 0,0
		for ( let j = 0; j <= ysegments; j ++ ) {
			let y = (j * ysegmentSize) - yhalfSize;
			vertices.push( x, y, 0);
			heights.push(0); // make them flat again
		}
	}
Now if we run our code, we should see an array start out initially as black and slowly being filled in with data, from right to left.
See the Pen jOMRpXm by caleb (@calebgannon) on CodePen.
All that we have to do now is get access to our microphones and feed the microphone data into the DATA array instead of the random values. An unfortunate reality of accessing microphones in the browser is that some form of user interaction is required. This makes sense, since it prevents web pages from secretly trying to access your microphone without you knowing. But it does make our job just a little bit more troublesome. There are a lot of ways to overcome this, my solution to this was to wrap the entire script we just wrote inside of an event listener that checks for when the user clicks within the document. You have to be careful though, and find a way to only limit it to run once, otherwise every single time you click it will start running a second copy of all this code! Here’s how I set mine up, it’s not elegant but it get’s the job done by making sure the code only runs if the first_click variable is true.
let first_click = true;
document.addEventListener("click", function(){
if (first_click) {
	first_click  = false;
        // rest of code goes here
}
Now we need to write the code to get our microphone access and stream that data into our analyzer, which will convert the raw audio information into the spectrum we want to plot, and store it on our DATA array.
let ACTX = new AudioContext();
let ANALYSER = ACTX.createAnalyser();
ANALYSER.fftSize = 4*frequency_samples;
ANALYSER.smoothingTimeConstant = 0.5;
let SOURCE;
navigator.mediaDevices.getUserMedia({ audio: {echoCancellation:false} }).then(process_audio);

function process_audio (stream) {
	SOURCE = ACTX.createMediaStreamSource(stream);
	SOURCE.connect(ANALYSER);
}
and with our ANALYSER set up, we just need to change the first line of code in our update_geometry function to pass in our audio spectrum into the DATA array.
function update_geometry() {
	ANALYSER.getByteFrequencyData(DATA);
	let start_val = frequency_samples+1;
	let end_val = n_vertices -start_val;
	heights.copyWithin(0, start_val, n_vertices+1);
	heights.set(DATA, end_val-start_val);
	mesh.geometry.setAttribute('displacement', new THREE.Uint8BufferAttribute(heights, 1));
}
Now when you open the window, nothing happens until you click somewhere on the screen. Depending on what browser you are using, you will be prompted in a different way to as for permission to use your microphone. Accept and start making noise, you should see your very own spectrogram! (The following codepen may require you to click the “Edit on Codepen” button for it to run. It seems my website blocks microphone requests. It also, obviously will not work without a microphone.)
See the Pen VwKNGLZ by caleb (@calebgannon) on CodePen.
There is one last thing we need to change. Humans don’t perceive frequencies in a linear fashion—a strong bass note feels like it has a lot more oomph than a mid or high tone of the same volume. Similarly, it is much easier to differentiate between a bass note and a mid tone than it is to tell the difference between two high pitched notes. We can modify the way we display our frequency spectrum to account for the way the tones feel to us perceptually by presenting our spectrum in a logarithmic scale. The code to make this change requires logarithmic interpolation. First we choose a base for our logarithm, in this case I went with e, meaning we are using the natural logarithm for our scale. Then, we calculate the logarithm of our maximum scaled value to find an upper bound (this is ypow_max below). We then linearly interpolate between 0 and ypow_max, before raising E to this power. Essentially, by linearly interpolating along the exponent in this expression we get nonlinearly spaced values following a logarithmic pattern.
let ypow_max = Math.log(ysize);
let ybase = Math.E;
// generate vertices and color data for a simple grid geometry
for (let i = 0; i <= xsegments; i ++ ) {
let x = ( i * xsegmentSize ) - xhalfSize;
for ( let j = 0; j <= ysegments; j ++ ) {
let powr = (ysegments-j)/ysegments*ypow_max;
let y = -Math.pow(ybase, powr) + yhalfSize + 1;
vertices.push( x, y, 0);
heights.push(0);
}
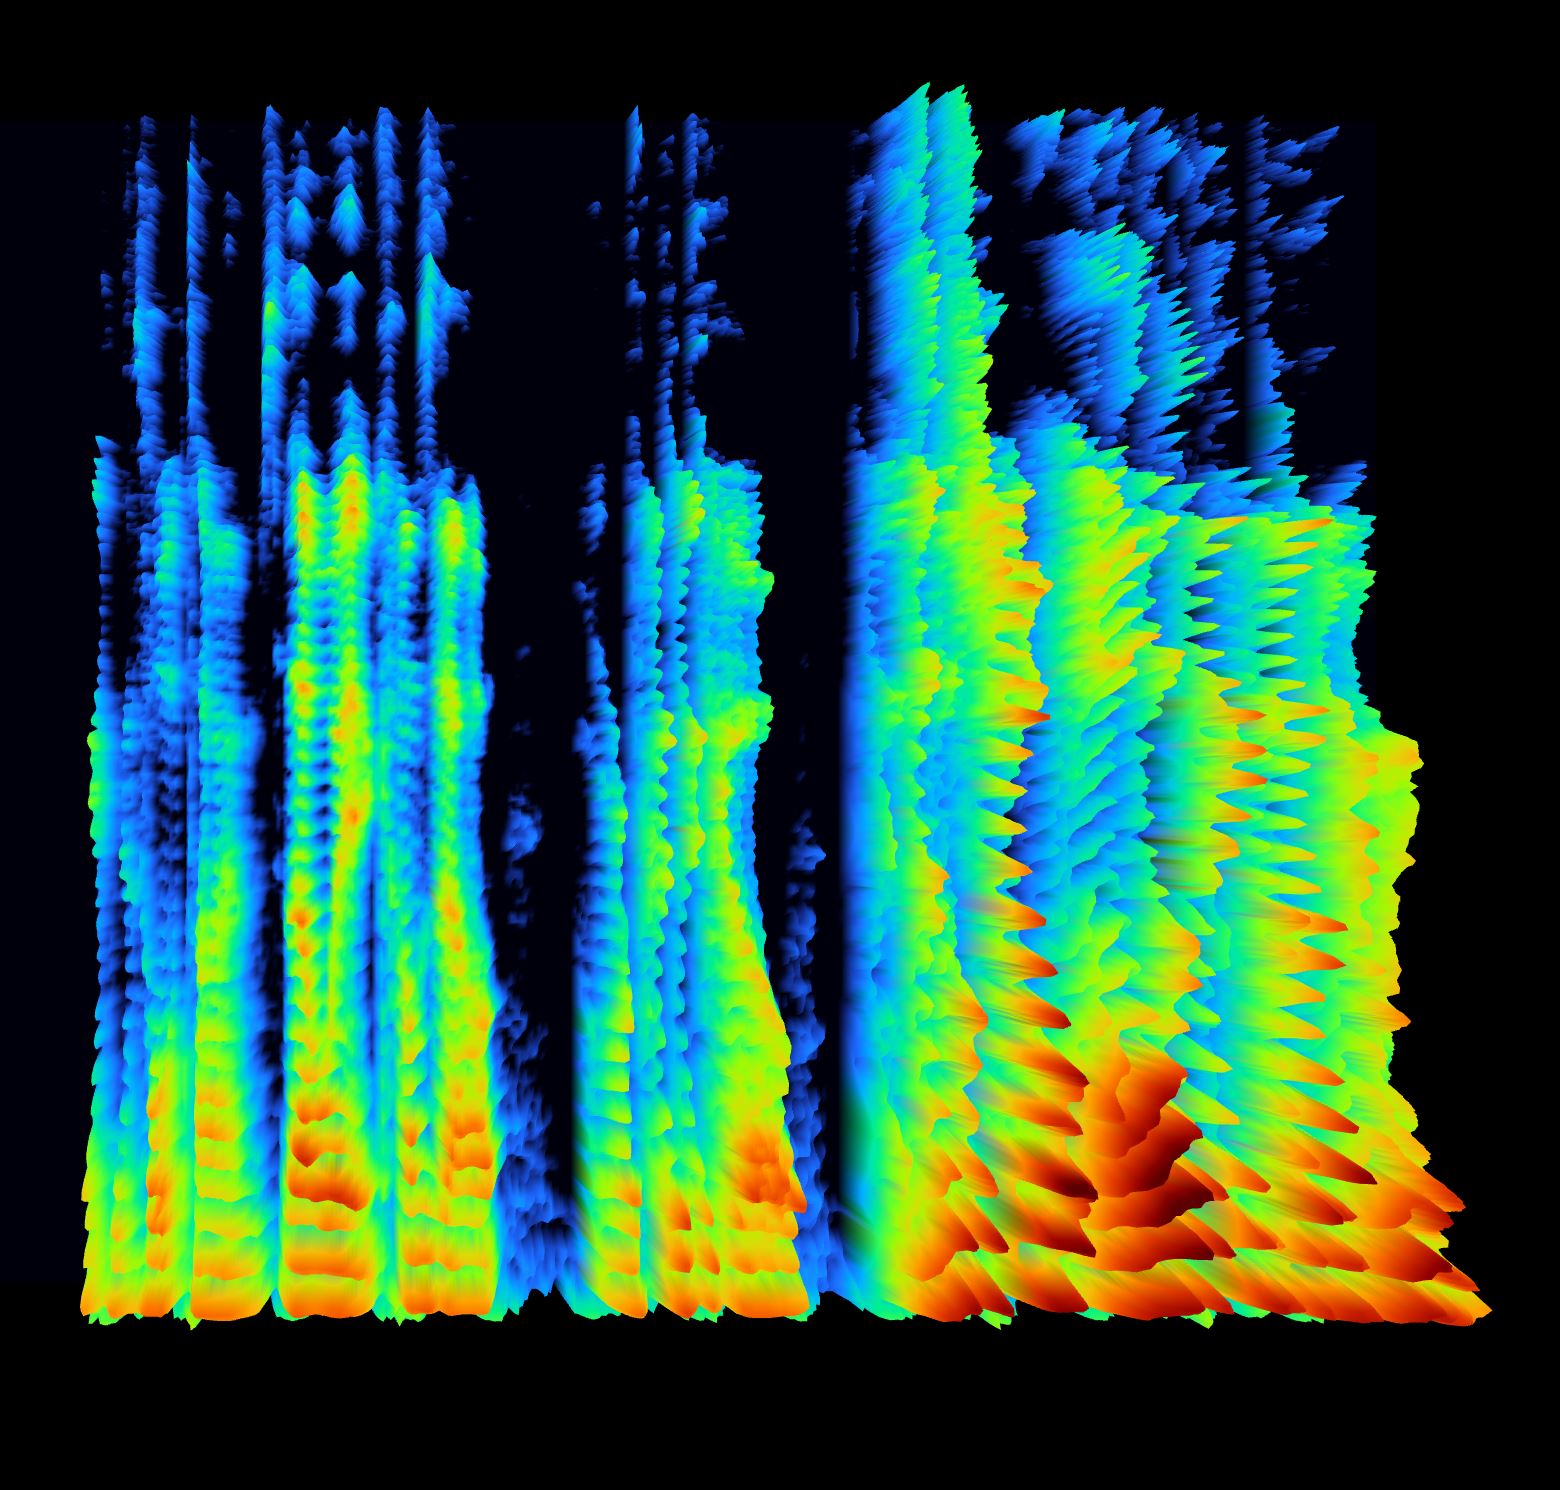
}And with that, we’re done! You should have a spectrogram that looks identical to this (that page requires you to click to get started). But in terms of ideas, this is really only the beginning. There are so many awesome things you can do to spice up this spectrogram. Maybe connect it to soundcloud and use it as a music visualizer, change the color scheme of the display (or even have it vary over time!). And, what we will look at next – perhaps move to non-Euclidian geometry! (Displaying the spectrum on a cube or sphere.)
If you do come up with your own version of this code I would love to see it! Show your creations in the comments as well as any feedback on things you would like to see or improvements to my code! 🙂
Hey man, great tutorial. So i have 2 question with this code, if i have a short mp3 audio will be able to create the spectrogram? and if so do you have any tip or idea on how to download the image created?
Thanks
Hey good question!
If you want to use mp3 instead of the microphone all you will need to do is change the audio source portion of this code. I’ve seen some examples on codepen sourcing music from soundcloud, so maybe looking over there could give you an idea of how to approach it!
If you want to download the image, there are a lot of ways to do it. three.js seems to have a way to download the canvas information like this example https://codepen.io/shivasaxena/pen/QEzAAv
I’m modifying this to allow the user to select from a list of .wav files. I have it working but can’t seem to reinitialize the scene and mesh from scratch once a new .wav is selected. I can clear the scene from the screen but can’t simply recall the init and set up a new scene from the new .wav. Great tutorial. Anything I’m missing?